EAC and AAC (neroAac): Difference between revisions
m ((re)edit categories) |
m (Korth moved page EAC and AAC to EAC and AAC (neroAac): add neroAac to title) |
(No difference)
| |
Revision as of 20:17, 19 July 2024
| Configuration | |
|---|---|
|
| |
| Compression | |
| Other | |
This page is a compression guide for configuring Nero AAC encoder with EAC for greater encoding flexibility. This guide will allow you to create Nero AAC files that will be compatible with ITunes and your IPod or any other digital audio player capable of playing AAC files.
See the full list in the EAC FAQ or in the EAC Compression Options guide.
Software Needed
Installation
Note: This guide assumes that EAC is has been configured for secure ripping, if not please follow this guide.
- Unzip the chosen neroaacenc.exe build into the same directory that EAC is in (Note you can use regular build or the SSE optimized version that comes in the zip file).
Configuration
- Open EAC and insert a CD into the drive.
- Click the EAC menu and select Compression Options.
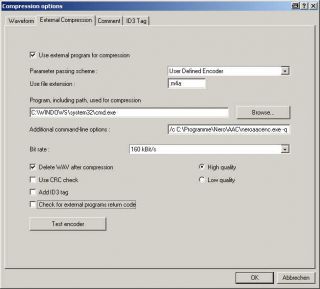
- Click the External Compression Tab, and put a check box in use external program for compression.
- Change Parameter Passing Scheme to User Defined Encoder.
- Change Use file extension to .m4a or .mp4
Note: Remember to use .m4a extension so that ITunes can read your metadata tags!
- Remove the ticks from Use CRC check, Add ID3 tag and check for external programs return code.
- In the Path for compression box, copy and paste one of the below strings.
- In the Additional command line options box, copy and paste one of the below strings.
Compress without metadata tagging
- Path for compression
C:\path\to\neroaacenc.exe
- Additional command-line options
-q 0.5 -if %s -of %d
Compress and set metadata tags

- Path for compression
C:\Windows\system32\cmd.exe
For older versions of EAC
- Additional command-line options
/c C:\path\to\neroaacenc.exe -q 0.425 -if %s -of %d && C:\path\to\neroaactag.exe %d -meta:artist="%a" -meta:album="%g" -meta:track="%n" -meta:title="%t" -meta:genre="%m" -meta:year="%y"
For EAC 1.0 beta 2 onwards
- Additional command-line options
/c C:\path\to\neroaacenc.exe -q 0.425 -if %source% -of %dest% && C:\path\to\neroaactag.exe %dest% -meta:artist="%artist%" -meta:album="%albumtitle%" -meta:track="%tracknr%" -meta:title="%title%" -meta:genre="%genre%" -meta:year="%year%" %hascover%-add-cover:front:"%coverfile%"%hascover%
- You need to substitute C:\path\to by the location of neroaac*.exe files.
- The above code invokes the windows command-line and tells EAC how to properly encode and tag your files.
- The -q option controls compression quality. If it is omitted, it defaults to 0.5.
- Lower values lead to lower quality and smaller files.
- Higher values mean higher quality, but bigger files.
- Any fraction between 0.05 to 0.95 are allowed.
- See [1] or [2] for what bitrate corresponds with what quality level
- For
-2passmode, a target bitrate needs to be set. In-2passmode,-qoption is not allowed.
For -2pass mode and minimized cmd windows
- This has been tested with EAC v1.0b4 and neroaacenc v1.5.4.0
- Additional command-line options
/c start /min /wait C:\neroaacenc.exe -br 176000 -2pass -if "%source%" -of "%dest%" && start /min /wait C:\neroaactag.exe "%dest%" -meta:artist="%artist%" -meta:album="%albumtitle%" -meta:track="%tracknr%" -meta:totaltracks="%numtracks%" -meta:disc="%cdnumber%" -meta:totaldiscs="%totalcds%" -meta:title="%title%" -meta:genre="%genre%" -meta:year="%year%" -meta:comment="EACv1b4_neroaacenc_176k_2pass" %haslyrics%-meta:lyrics="%lyrics%"%haslyrics% %hascover%-add-cover:front:"%coverfile%"%hascover%
External links
- Sticky thread this thread show's you how to use Nero AAC encoder with various program for Windows.
- Forum thread of first release of Nero AAC encoderthe first official release of Nero AAC encoder on Hydrogenaudio.
