Foobar2000:Converter: Difference between revisions
Beardgoggles (talk | contribs) (Updated page layout and added info on various functions.) |
Beardgoggles (talk | contribs) (Added component infobox, additional usage info.) |
||
| Line 1: | Line 1: | ||
{{panel|This page contains information specific to the new Converter included with foobar2000 versions 1.1 and newer. For older versions of foobar2000, see [[foobar2000:Preferences:Converter|Preferences:Converter]].|color=yellow}} | {{panel|This page contains information specific to the new Converter included with foobar2000 versions 1.1 and newer. For older versions of foobar2000, see [[foobar2000:Preferences:Converter|Preferences:Converter]].|color=yellow}} | ||
{{Foobar Component Infobox | |||
| name = Converter | |||
| module_name = foo_converter | |||
| developer = Peter Pawlowski | |||
| repository = | |||
| released = | |||
| released_ref = | |||
| stable_release = 1.5.4 | |||
| stable_release_date = 2019-09-04 | |||
| preview_release = | |||
| preview_release_date = | |||
| foobar2000_minimum = 1.1 | |||
| foobar2000_ui_module = | |||
| use = Audio file conversion | |||
| license = | |||
}} | |||
The '''Converter''' component is included with foobar2000 installers, and allows you to convert your audio files to other file formats. | The '''Converter''' component is included with foobar2000 installers, and allows you to convert your audio files to other file formats. | ||
| Line 6: | Line 21: | ||
==Usage== | ==Usage== | ||
[[Image:foobar2000_11_Converter_Setup.png|thumb|Overview page.]] | |||
* Right-click the relevant file(s) in a playlist to bring up the context menu. | * Right-click the relevant file(s) in a playlist to bring up the context menu. | ||
* Select "Convert" and then "..." to load the Converter Setup window. | * Select "Convert" and then "..." to load the Converter Setup window. | ||
| Line 15: | Line 31: | ||
'''Note:''' The Converter can only be accessed via context menu (right-clicking a file in a playlist), and not via the main File menu. | '''Note:''' The Converter can only be accessed via context menu (right-clicking a file in a playlist), and not via the main File menu. | ||
===Usage tips=== | |||
You can navigate between the overview page and the most recently viewed subpage using browse forward/back buttons on your mouse. | |||
You can also navigate through all the subpages with Ctrl+Tab / Shift+Ctrl+Tab. | |||
==Supported file formats== | ==Supported file formats== | ||
| Line 40: | Line 61: | ||
====Audio CDs==== | ====Audio CDs==== | ||
If the [[foobar2000:Components/Audio CD Writer (foo_burninate)|Audio CD Writer (foo_burninate)]] component is installed, a "Write Audio CD..." option | If the [[foobar2000:Components/Audio CD Writer (foo_burninate)|Audio CD Writer (foo_burninate)]] component is installed, a "Write Audio CD..." option is available. | ||
==Converter Setup dialog== | ==Converter Setup dialog== | ||
| Line 65: | Line 86: | ||
:: Like the name of the option suggests the converter will generate one output file for each selected tracks. | :: Like the name of the option suggests the converter will generate one output file for each selected tracks. | ||
:; Generate multi-track files | :; Generate multi-track files | ||
:: All tracks with the same formatted name will be put into the same file. If the output format has native support for multiple tracks in one file (e.g. Ogg and MP4 containers), the converter will use this. Otherwise the converter will generate an accompanying cue sheet file (.cue) for each multi-track file. | :: All tracks with the same formatted name will be put into the same file. If the output format has native support for multiple tracks in one file (e.g. Ogg and MP4 containers), the converter will use this. Otherwise the converter will generate an accompanying [[cue sheet]] file (.cue) for each multi-track file. | ||
:; Merge all tracks into one output file | :; Merge all tracks into one output file | ||
:: A single file is generated for all selected tracks. The converter will display a dialog window to choose the destination file name when conversion is started. The generated file contains a single track. No | :: A single file is generated for all selected tracks. The converter will display a dialog window to choose the destination file name when conversion is started. The generated file contains a single track. No cue sheet file is generated. | ||
===Processing=== | ===Processing=== | ||
| Line 75: | Line 96: | ||
; DSP | ; DSP | ||
: Apply the effects of any available [[DSP]]s to the converted content. Again, this will permanently apply the change to the output file. | : Apply the effects of any available [[DSP]]s to the converted content. Again, this will permanently apply the change to the output file. | ||
: Use the {{button|+}} buttons under "Available DSPs" to add them under "Active DSPs". Once added, configurable DSPs will show a {{button|…}} button. | |||
; DSP chain presets | ; DSP chain presets | ||
: Load any saved DSP presets. | : Load any saved DSP presets. | ||
=== | ===Other=== | ||
[[File:foobar2000 converter setup other.png|thumb|Other subpage.]] | |||
; ReplayGain-scan output files as albums | |||
: Scans all converted files and updates ReplayGain data. If permanent changes have been made to the output files' volume from using the ReplayGain settings under the [[#Processing|Processing]] options, new RG values will be generated. | |||
; Transfer metadata (tags) | |||
: Copies all [[tag]]s to the converted files. Where a "multi-track file" is generated, the resulting cue sheet will contain all cue sheet-compatible metadata. | |||
; Transfer ReplayGain info | |||
: Copies the existing RG tags to the converted files. | |||
==Advanced preferences== | ==Advanced preferences== | ||
| Line 87: | Line 113: | ||
; Additional command-line encoder paths | ; Additional command-line encoder paths | ||
: Enter the folder/file paths to any separate encoders you wish to use. In the example image on the right, a folder called "encoders" in foobar2000's installation directory is being used. | : Enter the folder/file paths to any separate encoders you wish to use. In the example image on the right, a folder called "encoders" in foobar2000's installation directory is being used. | ||
; Transcoding warnings | |||
: Alert the user before [[transcoding]] files. | |||
; Write UTF-8 cue sheets | ; Write UTF-8 cue sheets | ||
: Create cue sheets with UTF-8 text encoding, rather than ANSI. | : Create cue sheets with UTF-8 text encoding, rather than ANSI. | ||
| Line 92: | Line 120: | ||
==See also== | ==See also== | ||
* [[Foobar2000:Ripping CDs|Ripping CDs with foobar2000]] | * [[Foobar2000:Ripping CDs|Ripping CDs with foobar2000]] | ||
Revision as of 21:25, 8 November 2019
This page contains information specific to the new Converter included with foobar2000 versions 1.1 and newer. For older versions of foobar2000, see Preferences:Converter.
| Converter | |
|---|---|
 foo_converter | |
| Developer(s) | Peter Pawlowski |
| Release information | |
| Stable release | 1.5.4 (September 4, 2019) |
| foobar2000 compatibility | |
| Minimum version | 1.1 |
| UI module(s) | N/A |
| Additional information | |
| Use | Audio file conversion |
| View all components | |
The Converter component is included with foobar2000 installers, and allows you to convert your audio files to other file formats.
Note that this component is required for ripping CDs with foobar2000.
Usage
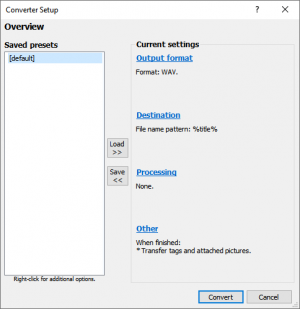
- Right-click the relevant file(s) in a playlist to bring up the context menu.
- Select "Convert" and then "..." to load the Converter Setup window.
- Make the relevant changes on each subpage, selecting "Back" on each page once done to return to the overview page.
- If required, click the Save << button to save the current settings as a preset.
- Click Convert.
Once a preset has been created, it can be accessed directly from the "Convert" menu.
Note: The Converter can only be accessed via context menu (right-clicking a file in a playlist), and not via the main File menu.
Usage tips
You can navigate between the overview page and the most recently viewed subpage using browse forward/back buttons on your mouse.
You can also navigate through all the subpages with Ctrl+Tab / Shift+Ctrl+Tab.
Supported file formats
Input file formats
The converter supports any formats playable by your foobar2000 configuration, natively or through optional input components.
Output file formats
Native
The following output formats are available "out of the box":
Additional
- AAC/MP4 - using Nero AAC encoder - command-line encoder executable (neroAacEnc.exe) required
- FLAC - command-line encoder executable (flac.exe) required
- MP3 - using LAME - command-line encoder executable (lame.exe) required
- Musepack - command-line encoder executable (mpcenc.exe) required
- Ogg Vorbis - command-line encoder executable (OggEnc.exe) required
- WavPack - command-line encoder executable (wavpack.exe) required
More output file formats can be added using "custom" encoder mode with other command-line encoders. Archives containing converter executables can be found at http://rarewares.org (Rarewares).
Paths to converter executables can be added using the Advanced preferences.
Audio CDs
If the Audio CD Writer (foo_burninate) component is installed, a "Write Audio CD..." option is available.
Converter Setup dialog
The Converter Setup dialog consists of:
- An overview page summarizing current settings and allowing you to easily manage presets.
- Subpages that deal with specific aspects of conversion:
- Output format selection
- Conversion destination - target folder, file splitting and file name formatting
- Processing - ReplayGain, DSP, and processing offered by optional components for things like DTS, HDCD, and pre-emphasis
- Other - optional preview generation, actions to perform after the conversion.
Destination
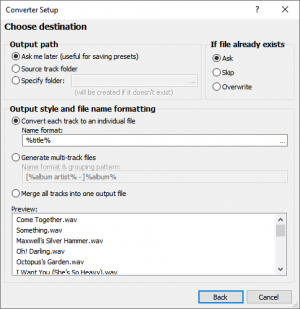
The Destination subpage defines how and where the converter generates the output files.
- Output path
- This section defines the root folder where output files are generated.
- If the file already exists
- This section defines how the converter handles file name conflicts with existing files. It can either overwrite the existing file or skip the file. If "Ask" is selected the converter will display a dialog window each time a file name conflict occurs during conversion. If "Skip" or "Overwrite" is selected it will always skip or overwrite files.
- Output style and file name formatting
- This section defines whether each track is converted to a separate file or multiple tracks are put into one file. The name format for both the single-track and the multi-track options allows the use of / (forward slash) or \ (backward slash) to generate subfolders inside the chosen root folder.
- Convert each track to an individual file
- Like the name of the option suggests the converter will generate one output file for each selected tracks.
- Generate multi-track files
- All tracks with the same formatted name will be put into the same file. If the output format has native support for multiple tracks in one file (e.g. Ogg and MP4 containers), the converter will use this. Otherwise the converter will generate an accompanying cue sheet file (.cue) for each multi-track file.
- Merge all tracks into one output file
- A single file is generated for all selected tracks. The converter will display a dialog window to choose the destination file name when conversion is started. The generated file contains a single track. No cue sheet file is generated.
Processing
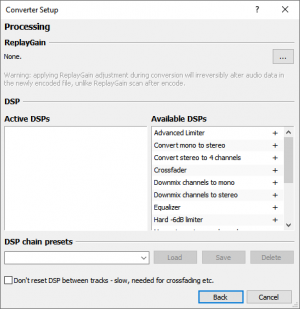
- ReplayGain
- Select the relevant ReplayGain settings to apply to the converted content. This will permanently apply the change to the output file.
- DSP
- Apply the effects of any available DSPs to the converted content. Again, this will permanently apply the change to the output file.
- Use the + buttons under "Available DSPs" to add them under "Active DSPs". Once added, configurable DSPs will show a … button.
- DSP chain presets
- Load any saved DSP presets.
Other
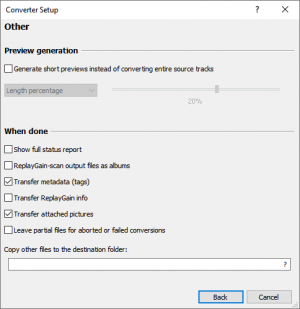
- ReplayGain-scan output files as albums
- Scans all converted files and updates ReplayGain data. If permanent changes have been made to the output files' volume from using the ReplayGain settings under the Processing options, new RG values will be generated.
- Transfer metadata (tags)
- Copies all tags to the converted files. Where a "multi-track file" is generated, the resulting cue sheet will contain all cue sheet-compatible metadata.
- Transfer ReplayGain info
- Copies the existing RG tags to the converted files.
Advanced preferences
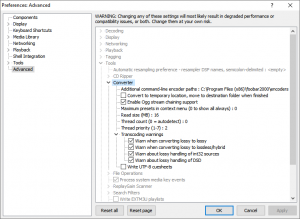
- Additional command-line encoder paths
- Enter the folder/file paths to any separate encoders you wish to use. In the example image on the right, a folder called "encoders" in foobar2000's installation directory is being used.
- Transcoding warnings
- Alert the user before transcoding files.
- Write UTF-8 cue sheets
- Create cue sheets with UTF-8 text encoding, rather than ANSI.
