ReplayGain 1.0 specification
Although music is encoded to a digital format with a clearly defined maximum peak amplitude, and although most recordings are normalized to utilize this peak amplitude, not all recordings sound equally loud. This is because once this peak amplitude is reached, perceived loudness can be further increased through signal-processing techniques such as dynamic range compression and equalization.[1] Therefore, the loudness of a given album has more to do with the year of issue or the whim of the producer than the intended emotional effect. Because of this, a random play through a music collection can have one leaping for the volume control every other track.
There is a solution to this annoyance: within each audio file, information can be stored about what volume change would be required to play each track or album at a standard loudness, and players can use this "replay gain" information to automatically nudge the volume up or down as required.
The ReplayGain specification is a standard which defines an appropriate reference level, explains a way of calculating and representing the ideal replay gain for a given track or album, and provides guidance for players to make the required volume adjustment during playback. The standard also specifies a means to prevent clipping when the calculated replay gain exceeds the limits of digital audio, and it describes how the replay gain information is stored within audio files.
Loudness measurement
Loudness is a subjective measure of the intensity of sound. The correlation of perceived loudness to sound pressure level is determined by the peculiarities of the auditory system. ReplayGain attempts to model those peculiarities with the following measurement procedure.
Loudness filter
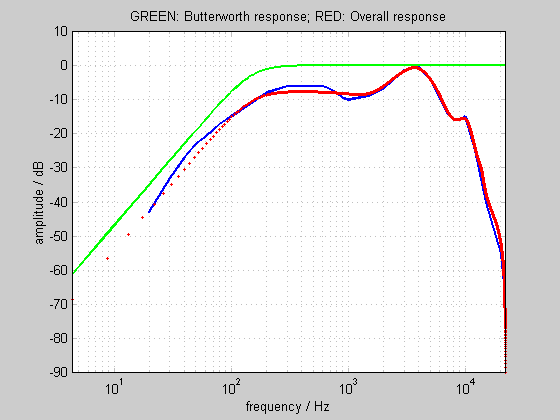
The human ear does not perceive sounds of all frequencies as having equal loudness. For example, a full-scale sine wave at 1 kHz sounds much louder than a full scale sine wave at 100 Hz, even though the two have identical energy. To account for this, the signal is filtered by an inverted approximation of the equal loudness curves (sometimes referred to as Fletcher–Munson curves) which describe the sensitivity of the ear as a function of frequency. The desired filter response derived from the equal loudness curves is shown in figure 1 (blue).
At higher frequencies a 10th order IIR filter designed by MATLAB's "yulewalk" function is an excellent approximation to the target. This is cascaded with a 2nd order Butterworth high pass filter, with a high pass frequency of 150 Hz (Figure 1 [green]). The resulting combined response (Figure 1 [red]) is close to the target response, and is used by ReplayGain.

The filter topology used for the components of the loudness filter is shown in figure 2. The filter coefficients for 48 and 44.1 kHz sample rates are given for the Butterworth and "yulewalk" components in tables 1 and 2 respectively. When using other sample rates, coefficients must be transformed to maintain the same filter response.
| b(0) | 0.98621192462708 | ||
| a(1) | 1.97223372919527 | b(1) | -1.97242384925416 |
| a(2) | -0.97261396931306 | b(2) | 0.98621192462708 |
| b(0) | 0.98500175787242 | ||
| a(1) | 1.96977855582618 | b(1) | -1.97000351574484 |
| a(2) | -0.97022847566350 | b(2) | 0.98500175787242 |
| b(0) | 0.03857599435200 | ||
| a(1) | 3.84664617118067 | b(1) | -0.02160367184185 |
| a(2) | -7.81501653005538 | b(2) | -0.00123395316851 |
| a(3) | 11.34170355132042 | b(3) | -0.00009291677959 |
| a(4) | -13.05504219327545 | b(4) | -0.01655260341619 |
| a(5) | 12.28759895145294 | b(5) | 0.02161526843274 |
| a(6) | -9.48293806319790 | b(6) | -0.02074045215285 |
| a(7) | 5.87257861775999 | b(7) | 0.00594298065125 |
| a(8) | -2.75465861874613 | b(8) | 0.00306428023191 |
| a(9) | 0.86984376593551 | b(9) | 0.00012025322027 |
| a(10) | -0.13919314567432 | b(10) | 0.00288463683916 |
| b(0) | 0.05418656406430 | ||
| a(1) | 3.47845948550071 | b(1) | -0.02911007808948 |
| a(2) | -6.36317777566148 | b(2) | -0.00848709379851 |
| a(3) | 8.54751527471874 | b(3) | -0.00851165645469 |
| a(4) | -9.47693607801280 | b(4) | -0.00834990904936 |
| a(5) | 8.81498681370155 | b(5) | 0.02245293253339 |
| a(6) | -6.85401540936998 | b(6) | -0.02596338512915 |
| a(7) | 4.39470996079559 | b(7) | 0.01624864962975 |
| a(8) | -2.19611684890774 | b(8) | -0.00240879051584 |
| a(9) | 0.75104302451432 | b(9) | 0.00674613682247 |
| a(10) | -0.13149317958808 | b(10) | -0.00187763777362 |
Input samples from the audio file to be analysed must be run in cascade manner through both of these filter components before being analysed further.
RMS level calculation
Next, the energy during each moment of the signal is determined by calculating the Root Mean Square (RMS) of the filtered signal every 50ms.[2]
The signal is chopped into 50ms long blocks. Then, for each block:[3]
- Every sample value is squared (multiplied by itself).
- The mean average is taken.
- The square root of the average is calculated.
For stereo signals, in step 3, the mean average of all squared samples from both channels over the 50ms measurement interval is taken.[4]
The result of this calculation is then converted to a decibel representation as follows:
Where:
- is the RMS value calculated above
- is the maximum peak-to-peak range of the samples in the audio file
Statistical processing
Where the average energy level of a signal varies with time, the louder moments contribute most to perception of overall loudness. For example, in human speech, over half the time is silence, but the perceived loudness of speech is primarily determined by the levels between silences.
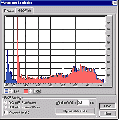
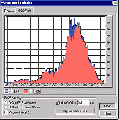
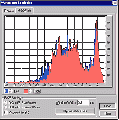
A good method to determine the overall perceived loudness is to sort the RMS values into numerical order, and then pick a value near the top of the list. For highly compressed pop music (e.g. Figure 5(c), where there are many values near the top), the choice makes little difference. For speech and classical music (Figures 5(a) and 5(b) respectively), the choice makes a huge difference. The value which most accurately matches human perception of perceived loudness is 95%,[5] so this value is used by ReplayGain.
- Figure 5: Loudness histograms
-
(a) Speech
-
(b) Classical music
-
(c) Pop music
Reference level
The audio industry does not have a standard for playback system calibration, but in the movie industry a calibration standard has been defined by the Society of Motion Picture and Television Engineers (SMPTE).[6] The standard states that a single channel pink noise signal with an RMS level of -20 dB relative to a full-scale sinusoid[7] should be reproduced at 83 dB SPL.[8]
ReplayGain adapts the SMPTE calibration concept for music playback. Under ReplayGain, audio is played so that its loudness, as measured using the procedures described in Loudness measurement above, matches the loudness of a pink noise signal with an RMS level of -14 dB relative to a full-scale sinusoid,[9] also measured using the procedures described above.
In ReplayGain implementations, the reference level is described in terms of the SMPTE SPL playback level. By the SMPTE definition, the 83 dB SPL reference corresponds to -20FS dB system headroom. The -14 dB headroom used by ReplayGain therefore corresponds to an 89 dB SPL playback level on a SMPTE calibrated system and so is said to be operating with an 89 dB reference level.
SMPTE cinema calibration calls for a single channel of pink noise reproduced through a single loudspeaker. In music applications, the ideal level of the music is actually the loudness when both speakers are in use. So, ReplayGain is calibrated to two channels of pink noise.[10]
Gain calculation
RG achieves loudness compensated playback by applying gain (or attenuation) dependent on the measured loudness of the audio file relative to the established reference level. The gain is calculated as follows:
Where all quantities are expressed in decibels:
- is the replay gain adjustment,
- is the measured loudness of the -14 dB pink noise reference and
- is the measured loudness of the audio file.
Replay gain is positive if the loudness of the audio file is lower than the pink noise reference. The gain is negative (representing an attenuation) if the loudness of the audio file is higher than that of the reference. The gain is stored as metadata with the audio file as described below and is used by players to adjust output volume of tracks as they are played as described in Player requirements below.
Metadata
For ReplayGain to do its work during playback, four values must be stored as metadata[11] with or within the audio file:
- Peak track amplitude
- Peak album amplitude
- Track replay gain
- Album replay gain
If calculated for an individual track, the loudness measurement (as specified above) yields track replay gain. If calculated on an album basis, with all tracks concatenated to make one long audio file, the loudness measurement yields album replay gain.
Replay gain
Under some listening conditions, it's useful to have every track sound equally loud. The problem with a track-by-track approach is that tracks which should be quiet in the context of the album on which they reside will be brought up to the level of all the rest. For casual listening, or in a noisy background, this can be a good thing. For serious listening, it does not respect the intent of the artist or mastering engineer; a tender ballad track will be blasting at the same loudness as a hard rock track on the same album. It's generally ideal to leave the intentional loudness differences between tracks in place, yet still correct for unmusical and annoying loudness differences between albums. To accomplish this, ReplayGain suggests that two different gain adjustments should be stored as metadata with each sound file.
Album replay gain represents the ideal listening gain for an entire album. ReplayGain reads the collection of tracks that comprise a album, and calculates a single replay gain for the whole set. This single gain can be used for playback of all tracks of the album. Intentionally quiet tracks then stay appropriately quieter than the rest. It still solves the basic problem (annoying, unwanted level differences between discs) because quiet or loud discs are still adjusted overall—so the pop CD that's 20 dB louder than the classical CD will be brought into line.
Peak amplitude
Scanning a track or album for the peak amplitude can be a time-consuming process. Therefore, it's helpful if this single value is stored as metadata. This is used to predict whether the required replay gain adjustment will cause clipping during playback.
The maximum peak amplitude value is stored as a floating point number, where 1.0 represents digital full scale. As with replay gain values, separate peak amplitude values are stored per track and per album.
For uncompressed files simply, scanners store the maximum absolute sample value held in the file on any channel for positive or negative excursion. The single sample value should be converted to a floating-point representation, such that digital full scale is equivalent to a value of 1.0.
Psychoacoustically coded audio, such as MP3, does not exist as a sequence of samples until it is decoded. Psychoacoustic coding of a heavily limited file can lead to sample values larger than digital full scale upon decoding. The coded files must be decoded using a fully compliant decoder that allows peak overflows (i.e. has headroom) and may result in peak amplitude values greater than 1.0.
Metadata format
From the standpoint of metadata storage, each audio file format presents a unique situation. There are three favored schemes defined for storage of ReplayGain metadata: ID3v2, Vorbis comments and APEv2. A survey of file formats is listed below with metadata schemes in order of preference for each:
- .aac (Advanced Audio Coding raw format) – No metadata support (use .mp4 instead)
- .aiff, .aif, .aifc (Apple Interchange File Format) – ID3v2 (in "ID3" IFF chunk)
- .ape, .apl (Monkey's Audio) – APEv2
- .bwf (Broadcast Wave Format) – ID3v2 (in RIFF chunk)
- .flac (Free Lossless Audio Codec) – Vorbis comments
- .mp3 (MPEG audio layer 3) – ID3v2, LAME VBR proposed tag specification
- .mp4 also .m4a, .m4b, .m4p, m4r (MPEG-4 Part 14) – ID3v2 (in "ID32" box)
- .mpc (Musepack) – APEv2
- .ogg (Ogg Vorbis) – Vorbis comments
- .tta (True Audio) – ID3v2, APEv2
- .wma (Windows Media audio) - Vorbis comments in Extended Content Description Object
- .wav (Windows PCM) – No metadata support (use .bwf instead)
- .wv (WavePak) – APEv2
ID3v2
The ID3v2 standard[12] defines a tag which is situated before the data in an MP3 file.[13] ID3 is used primarily with MP3 audio files but means of adapting the system to other file types have been developed.
The ID3v2 tag is divided into frames. The preferred means of storing ReplayGain metadata is use of TXXX key/value pair frames. Two other legacy schemes for storing ReplayGain metadata exist: RGAD and RVA2. These formats are documented in the appendix. Players may choose to look for these formats if metadata in the TXXX format is not found in the ID3v2 tag. New scanners may write these older formats in addition to the newer (TXXX) ones if they wish to remain backwards compatible with older players.
ReplayGain uses four TXXX frames. The header of a TXXX frame is coded as follows:
Frame ID       $54 58 58 58 ("TXXX")
Size           $xx xx xx xx (size of frame excluding this header)
Flags          $40 $00      (discard frame if audio data is altered)
Frame data is coded as follows:
Text encoding  $00          (ISO-8859-1 encoding)
Description    <key string> $00
Value          <value string>
The four frames associated with ReplayGain metadata use the following key/value pairs
| Metadata | Key | Value format |
|---|---|---|
| Track replay gain | REPLAYGAIN_TRACK_GAIN | [-]a.bb dB |
| Peak track amplitude | REPLAYGAIN_TRACK_PEAK | c.dddddd |
| Album replay gain | REPLAYGAIN_ALBUM_GAIN | [-]a.bb dB |
| Peak album amplitude | REPLAYGAIN_ALBUM_PEAK | c.dddddd |
Gains are specified textually in decibels. Negative gains (attenuation) are prefixed with a '-'. Positive gains have no prefix. Integral portion of the gain (a) may be one or two numeric (0-9) digits. If there is no integral portion the field is '0'. The decimal portion of the gain (bb) is two numeric digits. Gains are suffixed with a space followed by 'dB'.
Peak levels are specified textually as a positive decimal. Peak level is a dimensionless quantity with 1.000000 representing full scale. No suffix is included on peak values. The integer field (c) is typically 1 or 0. Six numeric digits in the decimal field (dddddd) is adequate to accurately represent peak values for 16-bit audio data.
A robust player should be prepared to parse the following variations in either replay gain or peak level metadata:
- Positive gains with leading '+'
- More or fewer significant digits than specified in any field
- Leading zeros or spaces in integer fields
- Missing or malformed 'dB' suffix (e.g. no space between numeric digits and suffix, alternate capitalization)
- Alternate capitalization of keys
Other formatting errors indicate more severe problems and should result in player ignoring data as if the frame did not exist.
Vorbis comments
A Vorbis comment[14] uses an ASCII key=value format. When Vorbis comments are used, the four ReplayGain metadata items are stored as separate comments. The keys and formatting for values is the same as specified for ID3v2. Keys and values are required by the Vorbis comment specification to be separated by '=' (equal character).
APEv2
The APEv2 metadata format[15] also organizes data into key/value pairs. Keys are ASCII format. A flags field allows support for several value formats including UTF-8 and binary. Under APEv2, ReplayGain meta data is stored using the same keys and data as ASCII values in the same format as specified for ID3v2.
Player requirements
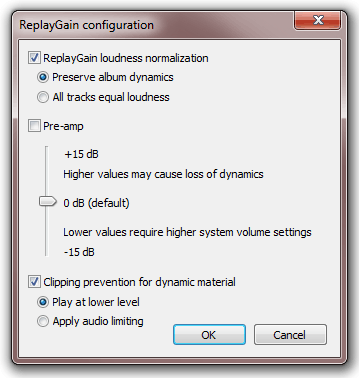
Loudness normalization, pre-amplification and clipping prevention are the operations performed by a ReplayGain player.
Loudness normalization
To properly normalize loudness, the player needs to determine if the user desires Track style level normalization (all tracks same loudness), or Album style level normalization (all albums same loudness, tracks of an album played at the same relative level as on the original release). This option should be selectable in the ReplayGain control panel (Figure 8). The player reads the corresponding gain metadata value from the file and scales the audio data as appropriate. Scaling the audio data simply means multiplying each sample value by a constant value. This constant is given by:
Or, in words, ten raised to the power of one-twentieth of replay gain.[16]
If the file only contains one of the replay gain adjustments (e.g. Album) but the user has requested the other (Track), then the player should use the one that is available (in this case, Album). If neither (Track or Album) gain metadata is available, then the player needs to choose a suitable default gain. Potential choices include unity gain (0 dB) or an average of gains from other tracks in the album or playlist.
Pre-amplification
Although the calibration level used by ReplayGain suggests that the average level of an audio track should be 14 dB below full scale, some pop music is dynamically compressed to peak at 0 dB and average around 3 dB below full scale. This means that, when the replay gain is applied, the level of such tracks will be reduced by 11 dB! If users are listening to a mixture of highly compressed and more dynamic tracks, ReplayGain will make the listening experience more pleasurable by bringing the level of the compressed tracks down into line with that of the others. However, if users are only listening to highly compressed music, then they may complain that all their files are now too quiet.[17]
To address this problem, a pre-amp feature should be incorporated into the player. A user-supplied pre-amp setting is an adjustment to the calculated replay gain. It should default to perform no adjustment. This means that casual users will experience a moderate reduction in the loudness of their compressed pop music. Less-compressed material can generally be played at the same loudness without clipping. Normalization of more dynamic material may cause clipping or invoke the clipping prevention mechanism (see below). Power users and audiophiles can reduce the pre-amp gain to enjoy the full dynamic range of all of their music.
If enabled, the player should read the user selected pre-amp gain, and scale the audio signal by the appropriate amount. For example, a +6 dB gain requires a scale of 106/20, which is approximately 2. The replay gain and pre-amp scale factors can be combined[18] for simplicity and ease of processing.
Clipping prevention
ReplayGain's suggestion of a -14 dB average playback level leaves sufficient headroom for the bulk of modern recordings. Nevertheless, there exists the possibility that after application of replay gain and pre-amp adjustment, a track may exceed full scale during its dynamic peaks. Without intervention, this will result in clipping, a severe form of distortion. Factors introducing the possibility of clipping include:
- Recordings from certain genres and certain periods in the history of commercial recordings require additional headroom. Although these recordings can be accommodated through a downwards adjustment of the pre-amp setting, it may be difficult to determine a safe adjustment and it may be undesirable to lower average level to accommodate the rare track which requires it.
- ReplayGain will make loud dynamically compressed tracks quieter, and quiet dynamically uncompressed tracks louder. The average levels will then be similar, but the quiet tracks will actually have louder peaks. If the user pushes the pre-amp gain upwards the peaks of the (originally) quieter tracks will be pushed well over full scale.
- In coded audio (e.g. MP3 files) a file that was hard-limited to digital full scale before encoding will often be pushed over the limit by the psychoacoustic compression. A decoder with headroom can recover the over full scale signal by reducing the gain.
ReplayGain suggests two possible solutions which prevent clipping in these situations. A player should support one or both of these.
Audio limiting
In situation 2 above, the user clearly wants all the music to sound very loud. To give them their wish, any signal which would peak above digital full scale should be hard limited at just below digital full scale. This is also useful at lower pre-amp gains, where it allows the average level of classical music to be raised to that of pop music, without distorting. The exact type of nature limiting or compression an implementation choice for the player.[19]
Reduced gain
The audiophile user will not want any compression or limiting on the signal. In this case the only option is to automatically and temporarily reduce the pre-amp gain below the user-selected setting for tracks where clipping would otherwise occur. Clipping can be predicted by examining the peak level of the track or album being played.
The player must read the peak amplitude metadata. If peak level metadata is unavailable, the player should assume a peak level of 1.0. If the peak level for both track and album is stored as metadata in the file, it is possible to calculate if, following the replay gain adjustment and pre-amp gain, the signal will clip at some point. If it won't, then no further action is necessary.
An overall scale factor for loudness normalization taking into account replay gain, pre-amp setting and clipping prevention through gain reduction is given below.
Hardware implementation
The above three steps are appropriate to software players operating on the digital signal in order to scale it. However, it is possible to send the digital signal to the DAC without level correction, and to place an attenuator in the analogue signal path. The attenuator can then be driven by the Replay Gain value. The clipping problem can be addressed by providing adequate headroom in the analog circuitry. Bit transparency and maximum signal to noise ratio is maintained in the digital signal and DAC process.[20]
Acknowledgements
The original ReplayGain proposal (an archive is also available) was developed by David Robinson and was published 10 July 2001. Additional updates were published by David Robinson through 10 October 2001.
The following acknowledgement was included with the original proposal, "The algorithm to calculate an ideal replay gain has grown from my research into human hearing, with many additional ideas drawn from the work of E. Zwicker, and Brian Moore. I am currently completing my PhD at the University of Essex, and have been funded by the EPSRC." Additionally David Robinson credited Glen Sawyer (Snelg) and Jim Casaburi (Walrus) for software contributions and Bob Katz and Matt Ashland for ideas.
This updated ReplayGain specification reflecting current and recommended practice was prepared by Kevin Gross in 2011.
Contact
For ReplayGain-related questions or contributions, please post in the General Audio section of the Hydrogen Audio forums.
Appendix
Notes
- ↑ Source: Wikipedia - Loudness war
- ↑ The block length of 50ms was chosen after studying the effect of values between 25ms and 1s. 25ms was too short to accurately reflect the perceived loudness of some sounds. Beyond 50ms there was little change (after statistical processing). For this reason, 50ms was chosen.
- ↑ If these steps are read backward, it should be clear why the process is called Root Mean Square averaging.
- ↑ One could sum channels of a stereo signal to mono before calculating the RMS level, but then any out-of-phase components (having the opposite signal on each channel) would cancel out to zero (i.e. silence). That's not how humans perceive them, so it's not a good solution.
- ↑ Based on experiments performed by David Robinson, "I tried values from 70% to 95%. For highly compressed pop music, the choice makes little difference. For speech and classical music, the choice makes a huge difference. The value which most accurately matches human perception of perceived loudness is around 95%, so this value is used by Replay Level."
- ↑ SMPTE RP 200:2002 – Relative and Absolute Sound Pressure Levels for Motion-Picture Multichannel Sound Systems – Applicable for Analog Photographic Film Audio, Digital Photographic Film Audio and D-Cinema
- ↑ "dB relative to a full-scale sinusoid" is preferred over "dBFS" as a unit of measure in this specification because there is some ambiguity whether the reference for dBFS is a full-scale square wave (peak reference) or a sine wave (RMS reference).
- ↑ Measured using a C-weighted, slow averaging SPL meter.
- ↑ The initial ReplayGain proposal used the same -20 dB reference used by SMPTE. The reference was raised to -14 dB early on in ReplayGain development. This reference is used in all current ReplayGain implementations.
- ↑ In reality, a monophonic pink noise wave file is used, and ReplayGain automatically assumes the file is being played through both speakers, as would any monophonic file.
- ↑ Metadata is "data about data." For example, the ID3 de facto standard provides a way to store artist, title, album title, track number, and other metadata in data blocks called "tags" immediately before or after the audio data in an MP3 file. Other metadata storage/tagging standards and conventions exist for other audio file formats.
- ↑ The ID3v2 format is explained at www.id3.org. The most useful document is the ID3v2 v2.3.0 standard. Although this document has been superseded by v2.4.0, the earlier document is complete (rather than an update), and in indexed HTML form. As such, it represents a better technical introduction to ID3v2.
- ↑ The original ID3 (v1) tags resided at the end of the file, and contained a few fields of information. The ID3v1 tag is not extensible and therefore cannot support ReplayGain metadata.
- ↑ Vorbis comment metadata format. ReplayGain metadata is documented on the Xiph Wiki.
- ↑ APEv2 Specification at Hydrogen Audio Wiki
- ↑ After any such operation, it's a good idea to dither the result. If this calculation and the pre-amp are implemented separately, then dither should only be added to the final result, just before the result is truncated back to 16 bits, or 24, or 8, as limited by the soundcard—not the file (i.e. after ReplayGain adjustment, an 8-bit file should be sent to a 16-bit soundcard at 16-bits).
- ↑ This problem can be especially noticeable on portable players with limited output or gain.
- ↑ Scale factors in Decibel units are added to produce the same effect as multiplying scale factors in linear units.
- ↑ Something like the Hard Limiter found in Cool Edit Pro (Syntrillium) would be appropriate for pop music at least.
- ↑ A system using today's 24-bit converters is unlikely to appreciate any overall gain in system performance with such an arrangement. A digitally-controlled analog gain element typically introduces significant noise and distortion.
See also
- This is not a normative part of the specification.
- ReplayGain 2.0 specification (draft)


