FAQ EAC
EAC Configuration and Usage Guide
EAC is the most powerful and advanced ripper available - it delivers the highest quality rips possible, and unsurprisingly is the most popular ripping software at Hydrogenaudio.
There's one catch - configuring it correctly is a newbie's nightmare. This guide will take you through all necessary steps of the configuration, so you will be able to enjoy high quality compressed audio no matter how advanced you are.
Before you continue reading this, you should first decide which format to use for your music archive. The choice is often difficult - the Audio format guide may make it easier for you.
To begin with, download EAC and install or unzip it to a folder of your choice. Also, you should download and install the VOB ASAPI Driver, especially if you are running Windows 2000/XP. Both programs are available at the download page.
Note: This tutorial assumes you are installing EAC for the first time, i.e. that the default settings are set to start with. If this is not the case, you can reset them by doing the following:
- Press <Windows Key> + <R> (or click 'Start | Run'), type regedit, and hit <Enter>.
- Go to the key HKEY_CURRENT_USER\Software\AWSoftware\EAC, and delete it by pressing Del.
EAC Configuration Wizard
Upon running EAC for the first time, a setup wizard will appear. Close it by clicking Cancel, and close and restart EAC. This is important - we have to do this to circumvent a bug in EAC which makes the program configure your reading devices (CD-ROM/DVD/CD-RW drives) incorrectly when it is first run.
After restarting, re-run the config wizard by clicking EAC -> Configuration Wizard. Keep a clean Audio CD handy, you'll need it in a minute to test and configure your drives.
Click Next; EAC will now list all CD drives it found in your system (all of them should be checked). Click Next again.
You will now be asked what read mode to use for the drive. Be sure to enable I prefer to have accurate results:

Click Next again. On the next page, click I don't trust these values, detect the features for my drive.

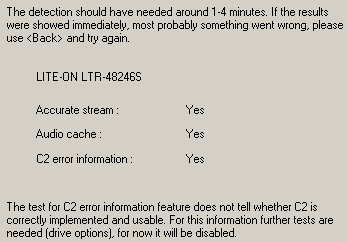
Now, insert an Audio CD into your drive (if you have more than one, you will see in the window which one to use), and click Next twice. EAC will now perform some tests in order to determine your drive's capabilities, and display the results within a few minutes.

If this is the case, click Next again. If you have more than one drive, the same procedure must now be repated for the other drives; once all drives have been tested, a summary like this will be displayed:

Don't rely on this. This is purely a feature-based ranking (mainly dependant on the Audio Caching feature which is an obstacle for secure audio extraction) - it provides no assessment of the drives' actual ripping quality (in this example, EAC is completely wrong - the NEC drive is totally unreliable for audio extraction, while the Lite-On is excellent). You will have to test this for yourself later.
Now, click Next again. EAC will now ask you whether or not you would like to configure the LAME encoder - uncheck the appropriate option, and proceed to the next page:

You will now be asked for your e-mail address in order to access the freedb online music database. You needn't enter your real one, something like this will do:

Click Next, and select I am an expert, let me use the full potential of EAC on the next page:

Don't worry about it if you're not an expert ;-) - this tutorial explains all important options. Also, when run in Beginner Mode, EAC resets some settings that are important to us.
Click Finish now to close the wizard.
EAC Options
Check out the EAC options in the EAC menu. While there isn't necessarily much you should change, it is important that you set error recovery quality to "high". Notice that the below Coaster Factory tutorials are for EAC 0.9 Prebeta9, so don't take everything as a fact.
<html>
</html>
CD-ROM Drive Options
For perfect rips, you should setup your CD-ROM drive correctly (secure mode options, offset correction options, gap detection options). Go to the drive options in EAC menu and follow these instructions:
Drive Setup (done once):
Select: Secure mode with the following drive features (recommended)
You will need to detect & apply drive features when using secure mode but only if you chose not to use the configuration wizard otherwise you can skip drive setup. Beware that these features are unique to every CD-ROM drive
Drive Features
- Caching/Drive caches audio
- If EAC reports "Caching: Yes" your drive caches audio data, every sector read will be read from cache and is identical, this will increase the probability of errors & cause a speed decrease. EAC needs to clear the cache by overreading it, enable this by ticking the "drive caches audio" box.
- Tip: EAC may misinform about audio caching as an alternative you can use Feurio's audio caching test found in Feurio.exe\Ctrl+Alt+P\Test device\Cache test.
- Tip: Some drives disable audio caching at low speeds, if your drive is set to DMA transfer mode try changing it to PIO only transfer mode then re-test for caching.
- Accurate Stream/Drive has ‘Accurate Stream’ feature
- If EAC reports "Accurate Stream: Yes" your drive doesn't jitter this will decrease the probability of errors & cause a speed increase, enable this option by ticking the "Accurate Stream" box.
- C2 Error Info/Drive is capable of retrieving C2 error information"
- With C2 enabled EAC's error detection becomes dependent on the drives C2 accuracy which varies from drive to drive & increases the probability of errors, this feature also results in a speed increase because EAC doesn't read the data twice anymore, If your drive supports this feature & you decide to use it enable this by ticking C2 Error Info box.
- Tip: To determine your drives C2 accuracy you could attempt creating a DAE Quality test CD. This takes a long time though. If you are not completely sure your drive supports C2 correctly you should disable this feature in EAC.
- Tip: The Coaster Factory, Eac-Audio.de have databases with user reported drive settings, you can use them to determine the appropriate features for your drive.
So an ideal drive would support accurate stream (tick) & wouldn't cache audio (no tick).
<html>
</html>
Freedb/Database Options
If you are online, go to the freedb/database options in the EAC menu. Put in an email address and click "get active freedb server list..."
(still under construction...)
Additional reading
- EAC Gap settings
- EAC CUE Sheets ASCII formats explained
