EAC and Musepack: Difference between revisions
mNo edit summary |
(Category:Guides|EAC Guides) |
||
| Line 37: | Line 37: | ||
* [[Exact_Audio_Copy|Exact Audio Copy]] | * [[Exact_Audio_Copy|Exact Audio Copy]] | ||
* [[Musepack]] | * [[Musepack]] | ||
[[Category:Guides]] | |||
[[Category:EAC Guides]] | |||
Revision as of 22:24, 6 September 2006
Software Needed
Installation
Note: This guide assumes that EAC is has been configured for secure ripping, if not please follow this guide.
- Unzip the chosen musepack version into the same directory that EAC is in.
Configuration
- Open EAC and insert a CD into the drive.
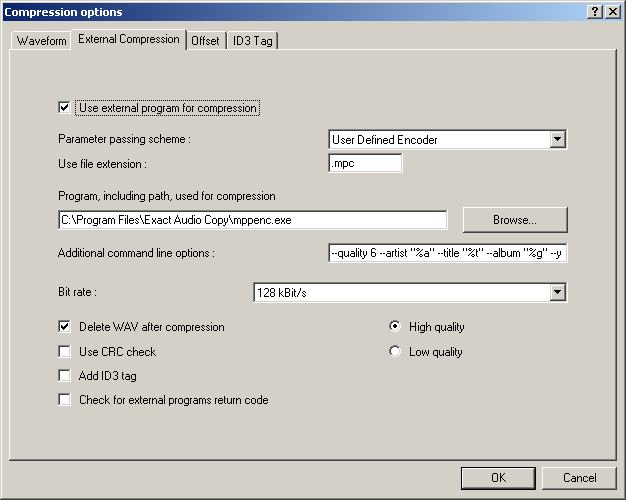
- Click the EAC menu and select Compression Options.
- Click the External Compression Tab, and put a check box in use external program for compression.
- Change Parameter Passing Scheme to User Defined Encoder.
- Change Use file extension to .mpc.
- Click the Browse button and locate the MPPENC.EXE that you unzipped earlier.
- Remove the ticks from Use CRC check, Add ID3 tag and check for external programs return code.
- In the Addtional command line options box, copy and paste one of the below strings based on the Tag you would prefer.
No Tags:
--quality 6 %s
APEv2 tag:
--quality 6 --artist "%a" --title "%t" --album "%g" --year "%y" --track "%n" --genre "%m" %s
Note: If you wanted to change the quality setting the green portion is what you would substitute with the new setting e.g. --quality 10 or --quality 4.
- Do not worry what bit rate is shown in the bit rate drop down box, this will be ignored.

