CDex and FLAC: Difference between revisions
(→Installation: Added info about Portable) |
m (→Installation: adware warning) |
||
| Line 7: | Line 7: | ||
==Installation== | ==Installation== | ||
Just run the installer. | Just run the installer (AdWare: advertising-supported istallation). If additional Windows redistributable components are needed, they will be downloaded during install. If you prefer, download and unzip the "Portable" version. It's an older version, but the basic functionality is current. | ||
==Configuration== | ==Configuration== | ||
Revision as of 16:34, 27 November 2019
This guide describes how to rip FLAC files from CD with CDex. If configured as described below, CDex will automatically retrieve CD artist, title, year, genre, and track names from freedb.
Software needed
CDex has native FLAC support; there is no need to download anything else.
If you wish to use a different version of FLAC than included in the DLL, you'll need to configure it as an External Encoder. See "Advanced command-line" below.
Installation
Just run the installer (AdWare: advertising-supported istallation). If additional Windows redistributable components are needed, they will be downloaded during install. If you prefer, download and unzip the "Portable" version. It's an older version, but the basic functionality is current.
Configuration
Basic
- Open CDex and insert a CD into the drive
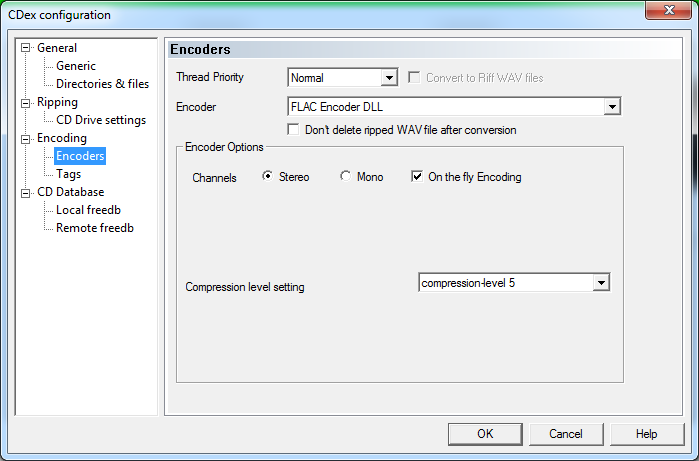
- Click the Options menu then click Settings and select Encoder tab
- Change Encoder drop down menu to FLAC Encoder DLL
- Confirm that On the fly Encoding is checked
- If desired, change the compression setting level (default: compression-level 5 | maximum: compression-level 8)
- Click OK
- On toolbar at right side of main CDex window, click the button second from the top (Extract CD track(s) to Compressed Audio File(s))
- CDex will begin extracting tracks from your default CD-ROM drive to the folder and filenames as set below
Suggested Additional Settings
- Click the Options menu then click Settings
General > Directories & files
- Set Filename Format the way you want it; e.g. %1\%2\%7 - %4 creates files named "01 - Trackname" within an Album folder within an Artist folder
- Set the two directories for output files where you want them
Ripping > CD Drive settings
- Check box for "Eject CD when ripping has been completed"
Encoding > Tags
- Un-check all ID3 Tag Versions
CD Database > Remote freedb
- Enter something in "Your E-mail address"; can be user@domain.com
- Check box for "Auto connect to remote freedb"
Advanced command-line (not necessary if CDex configured as above)
To use FLAC as external command-line encoder change Encoder to External Encoder and specify the path to your local FLAC.EXE file. The Parameter string is:
"-5 -V -o %2 -T "artist=%a" -T "title=%t" -T "album=%b" -T "date=%y" -T "tracknumber=%tn" -T "genre=%g" -"
- Note: the number in green can be substituted with your desired compression level. The default compression is -5; the maximum compression is -8. For reference, maximum compression typically yields files a few percent smaller than default compression.
Bitrate setting does not matter. File Extension is flac and all three checkboxes should be checked.
Screenshot

CDex and CUE Sheets
- CDex has limited support for creating CUE sheets in current beta release
