EAC and Monkey's Audio: Difference between revisions
Nuclearist (talk | contribs) |
Nuclearist (talk | contribs) |
||
| Line 1: | Line 1: | ||
==Software Needed== | ==Software Needed== | ||
* [http://www.exactaudiocopy.de/en/index.php/resources/download/ Exact Audio Copy] | * [http://www.exactaudiocopy.de/en/index.php/resources/download/ Exact Audio Copy] | ||
Revision as of 20:45, 1 August 2016
Software Needed
Installation
Note: This guide assumes that EAC is has been configured for secure ripping, if not please follow this guide.
- Install Monkey's Audio using the default location.
Configuration
- Open EAC and insert a CD into the drive.
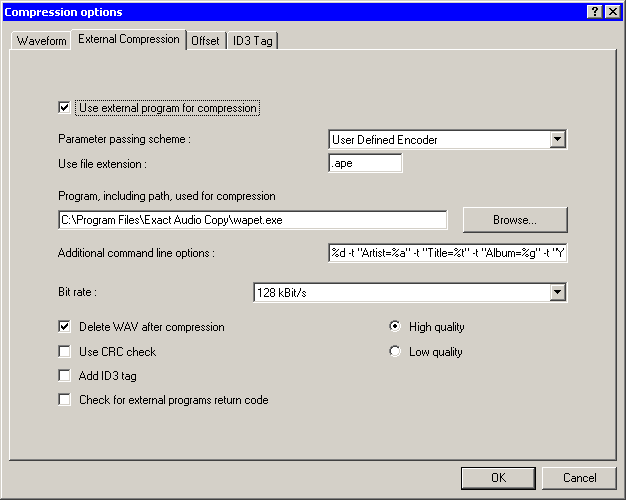
- Click the EAC menu and select Compression Options.
- Click the External Compression Tab, and put a check box in use external program for compression.
- Change Parameter Passing Scheme to User Defined Encoder.
- Change Use file extension to .ape if not already that.
- Click the Browse button and locate in "Monkey's Audio" file folder the MAC.exe.
- Remove the ticks from Use CRC check, Add ID3 tag and check for external programs return code.
- In the Addtional command line options box, copy and paste the string below.
APEv2 Tag:
%source% %dest% -c2000 -t "Artist=%artist%" -t "Title=%title%" -t "Album=%albumtitle%" -t "Year=%year%" -t "Track=%tracknr%" -t "Genre=%genre%"
Note: Alter this switch for the desired compression mode
| -c1000 | Fast |
| -c2000 | Normal |
| -c3000 | High |
| -c4000 | Extra High |
| -c5000 | Insane |
- Do not worry what bit rate is shown in the bit rate drop down box, this will be ignored.

