CDex and FLAC: Difference between revisions
(→Basic: Added suggested settings) |
|||
| Line 17: | Line 17: | ||
:best: --compression-level 8 ) | :best: --compression-level 8 ) | ||
* Click '''OK''' | * Click '''OK''' | ||
* | * On toolbar at right, click button second from the top ''(Extract CD track(s) to Compressed Audio File(s))'' | ||
* | * '''CDex''' will begin extracting tracks from your default CD-ROM drive to the '''Folder''' and '''Filename''' as set below | ||
===Suggested Additional Settings=== | ===Suggested Additional Settings=== | ||
* Click the '''Options''' menu then click '''Settings''' | * Click the '''Options''' menu then click '''Settings''' | ||
General > Directories & files | '''General''' > '''Directories & files''' | ||
* Set Filename Format the way you want it; e.g. %1\%2\%7 - %4 gives ARTIST\ALBUM\01 - TRACK | * Set Filename Format the way you want it; e.g. %1\%2\%7 - %4 gives ARTIST\ALBUM\01 - TRACK | ||
* Set the two directories for output files where you want them | * Set the two directories for output files where you want them | ||
Ripping > CD Drive settings | '''Ripping''' > '''CD Drive settings''' | ||
* Check box for "Eject CD when ripping has been completed" | * Check box for "Eject CD when ripping has been completed" | ||
Encoding > Tags | '''Encoding''' > '''Tags''' | ||
* Un-check all ID3 Tag Versions | * Un-check all '''ID3 Tag Versions''' | ||
CD Database > Remote freedb | '''CD Database''' > '''Remote freedb''' | ||
* Enter something in "Your E-mail address"; can be user@domain.com | * Enter something in "Your E-mail address"; can be user@domain.com | ||
* Check box for "Auto connect to remote freedb" | * Check box for "Auto connect to remote freedb" | ||
Revision as of 20:43, 10 January 2013
This guide acts as a quick and painless way to make a lossless-backup with CDex and FLAC. It does not go into detail about configuring cdparanoia.
Software needed
Note: CDex has native FLAC support; no need to download anything else
Installation
Just run the installer. If additional Windows redistributable components are needed, they will be downloaded during install.
Configuration
Basic
- Open CDex and insert a CD into the drive
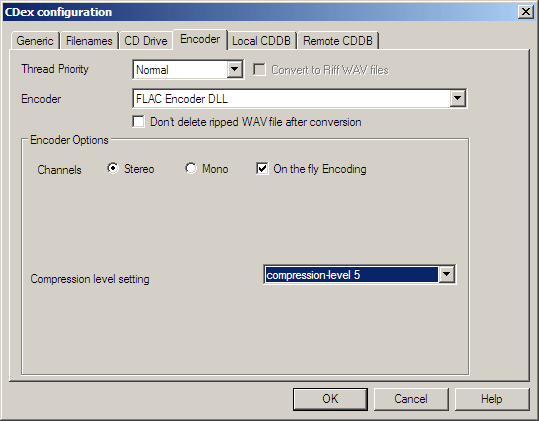
- Click the Options menu then click Settings and select Encoder tab
- Change Encoder drop down menu to FLAC Encoder DLL
- Confirm that On the fly Encoding is checked off
- Change the appropriate compression setting level (default: -compression-level 5 |
- best: --compression-level 8 )
- Click OK
- On toolbar at right, click button second from the top (Extract CD track(s) to Compressed Audio File(s))
- CDex will begin extracting tracks from your default CD-ROM drive to the Folder and Filename as set below
Suggested Additional Settings
- Click the Options menu then click Settings
General > Directories & files
- Set Filename Format the way you want it; e.g. %1\%2\%7 - %4 gives ARTIST\ALBUM\01 - TRACK
- Set the two directories for output files where you want them
Ripping > CD Drive settings
- Check box for "Eject CD when ripping has been completed"
Encoding > Tags
- Un-check all ID3 Tag Versions
CD Database > Remote freedb
- Enter something in "Your E-mail address"; can be user@domain.com
- Check box for "Auto connect to remote freedb"
Advanced command-line
- To use FLAC as external command-line encoder change Encoder to External Encoder and specify flac.exe or your path to appropriate executable. Parameter string:
"-5 -V -o %2 -T "artist=%a" -T "title=%t" -T "album=%b" -T "date=%y" -T "tracknumber=%tn/%tt" -T "genre=%g" -"
- Note: the number in green can be substituted for appopriate compression level. The default is -5 the best is -8.
Screenshot

CDex and CUE Sheets
- CDex has limited support for creating CUE sheets in current beta release
