EAC Lossless Backup: Difference between revisions
m (→Drive Options) |
|||
| Line 50: | Line 50: | ||
* ''Drive has 'Accurate Stream' feature'' : Enable if your drive has Accurate Stream. (This setting tells EAC not to perform additional synchronization.) | * ''Drive has 'Accurate Stream' feature'' : Enable if your drive has Accurate Stream. (This setting tells EAC not to perform additional synchronization.) | ||
* ''Drive caches audio'' : Enable if your drive has Caching. (This will erase the cached data after every read so that the secure mode can actually work. If your drive doesn't cache then it's a good thing since this setting cripples your extraction speed.) | * ''Drive caches audio'' : Enable if your drive has Caching. (This will erase the cached data after every read so that the secure mode can actually work. If your drive doesn't cache then it's a good thing since this setting cripples your extraction speed.) | ||
* ''C2 Error Info'' : Enable if your drive provides it and you're confident it will work correctly; otherwise, disable. (Generally speaking, this feature provides a speed increase at the expense security. With many drives, errors can go undetected when this setting is enabled.) If you're not getting matching T&C checksums (see the section on [ | * ''C2 Error Info'' : Enable if your drive provides it and you're confident it will work correctly; otherwise, disable. (Generally speaking, this feature provides a speed increase at the expense security. With many drives, errors can go undetected when this setting is enabled.) If you're not getting matching T&C checksums (see the section on [http://wiki.hydrogenaudio.org/index.php?title=EAC_Lossless_Backup#Ripping_a_CD Ripping a CD]), try ripping again with this setting disabled. | ||
'''Drive''' | '''Drive''' | ||
Revision as of 07:59, 13 January 2009
This tutorial will walk you through the steps required to produce lossless backups of your CDs using Exact Audio Copy.
Configuring Exact Audio Copy
Open the EAC menu and edit the following options:
EAC Options
Extraction
- Fill up missing offset samples with silence : Checked
- No use of null samples for CRC calculations : Unchecked (This option isn't really important and has absolutely no influence on the extraction quality.)
- Synchronize between tracks : Checked (See here)
- Delete leading and trailing silent blocks : Unchecked
- Skip track extraction on read or sync errors : Your decision.
- Skip track extraction after duration longer than : Your decision.
- After each: XX mins of extraction, cool down the drive for YY mins : Use only if necessary.
- Lock drive tray during extraction : Checked (Prevents accidental opening of drive tray)
- Extraction and compression priority : Normal for most situations; Idle for old and slow computers; High for computers with multi-core processors or multiple CPUs.
- Error recovery : Medium or High (Depending on the disc, setting this to high can hinder EAC's ability to report errors and may not improve the odds of getting accurate data.)
General - All options here do not affect the extraction and compression of the CD so choose what you see fit.
Tools
- Retrieve UPC/ISRC codes in CUE sheet generation : Your decision.
- Use CD-Text information in CUE sheet generation : Your decision.
- Create '.m3u' playlist on extraction : Your decision.
- Automatically write status report after extraction : Your decision.
- On extraction, start external compressors queued in the background : Checked unless it causes problems. Use only one compressor thread unless your computer has a multi-core processor or multiple CPUs.
- Do not open external compressor window : Your decision. (Depending on how the external compressor is configured this feature may not work as expected.)
- Activated beginner mode, disable all advanced features : Unchecked (You're no beginner with this guide.)
Normalize - DISABLE normalization; this is supposed to be a lossless backup!
Filename - This can be whatever you would like it to be. Here's an example:
- Naming scheme : %A\(%Y) %C\%N - %T
- Various Artist : Various\(%Y) %C\%N - %T (%A)
Catalog - Not important
Directories - Up to you.
Write - Nothing to do with extraction here.
Interface - Try the native interface first. If it doesn't work, try an external one. Nero's ASPI Driver is the most common, but ForceASPI may offer better compatibility.
Drive Options
Extraction Method
Select "Secure mode with the following drive features (Recommended)" Place a Audio CD in the drive and run "Detect Read Features..." With the information obtained select:
- Drive has 'Accurate Stream' feature : Enable if your drive has Accurate Stream. (This setting tells EAC not to perform additional synchronization.)
- Drive caches audio : Enable if your drive has Caching. (This will erase the cached data after every read so that the secure mode can actually work. If your drive doesn't cache then it's a good thing since this setting cripples your extraction speed.)
- C2 Error Info : Enable if your drive provides it and you're confident it will work correctly; otherwise, disable. (Generally speaking, this feature provides a speed increase at the expense security. With many drives, errors can go undetected when this setting is enabled.) If you're not getting matching T&C checksums (see the section on Ripping a CD), try ripping again with this setting disabled.
Drive
- Drive read command : Select Autodetect read command now so that it will not have to figure it out every time your rip a CD.
- "Big Endian" byte order (Motorola) : Only select this if extracted tracks consist of noise. Otherwise, leave it disabled.
- Swap channels : Only select this if your drive has the stereo channels backwards. Otherwise, leave it disabled.
- Spin up drive before extraction : Only select this if your drive has difficulty reading data on spin-up. Otherwise, leave it disabled.
Offset / Speed
Visit the AccurateRip Drive Offset Database to find your drive's read offset correction value. If your drive isn't in the database you may want to install AccurateRip and let it configure the read sample offset correction for you (you may want to install AccurateRip anyway since it really enhances EAC's ability to verify your rips). A more painful alternative in determining your offset correction is to find at least two CDs from this list which give you identical results when running "Detect read sample offset correction...". When using this method it is imperative that the number in the right-hand column of the table matches (as closely as possible) the number found along the on inner-ring of your CD.
- Use read sample offset correction : Enable and enter your drive's offset value into the field.
- Overread Lead-In and Lead-Out : Press the button that says "Detect read sample offset correction". Enable this setting if it says your drive can overread from both the Lead-In and Lead-Out or if it says Lead-Out and your offset correction is positive or if it says Lead-In and your offset correction is negative. Otherwise disable it.
- Speed Selection : Actual (You may want to adjust this when ripping discs that produce errors.)
- Allow speed reduction during extraction : Enable (Disabling this setting may improve accuracy with some drives.)
- CD-Text Read capable drive : Enable if your drive supports it.
Gap Detection
- Gap/Index retrieval method : This will not affect the extraction quality. Choose the method that gives the fastest results (usually method A).
- Detection accuracy : Secure (You may have to reduce the level if EAC hangs while detecting gaps.)
Writer - Not related to extraction.
Compression Options

Waveform - Can be ignored because it does not affect compression to any other format besides wav.
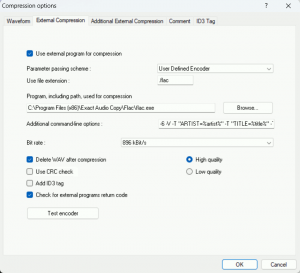
External Compression - You may use many different encoders for this section. See below for most lossless encoder options.
- Use external program for compression : Enable
- Parameter passing scheme : User Defined Encoder
- Bit rate : N/A. This gets ignored when using a user defined encoder and following the additional command line options specified below.
- Delete WAV after compression : Enable
- Use CRC check : Disable
- Add ID3 tag : Disable (encoder does it automatically).
- Check for external programs return code : Your decision.
Encoding Options
The codec you choose is completely up to you; Use the lossless comparison article to help you decide. Once you have made up your mind, install the following codec using the following links:
Free Lossless Audio Codec (FLAC)
- Use file extension : .flac
- Program, including path, used for compression : Browse and locate 'flac.exe'.
- Additional command line options :
-8 -T "artist=%a" -T "title=%t" -T "album=%g" -T "date=%y" -T "tracknumber=%n" -T "genre=%m" %s
Note: The green portion is where you would change the compression level or add settings for the FLAC encoder. You may want to add -V in order to verify that there were no encoding errors.
Apple Lossless using iTunes CLI Encoder (iTunes required)
- Note: If you have On extraction, start external compressors queued in the background checked in EAC Options, make sure you have it set to use only one compressor thread.
- Use file extension : .m4a
- Program, including path, used for compression : Browse and locate 'iTunesEncode.exe'.
- Additional command line options :
-e "Lossless Encoder" -a "%a" -l "%g" -t "%t" -g "%m" -y %y -n %n -i %s -o %d -d
Monkey's Audio w/ Wapet for tagging
- Note: Monkey's Audio doesn't support tagging command lines so Wapet must be used in conjunction.
- Use file extension : .ape
- Program, including path, used for compression : Browse and locate 'wapet.exe'.
- Additional command line options :
%d -t "Artist=%a" -t "Title=%t" -t "Album=%g" -t "Year=%y" -t "Track=%n" -t "Genre=%m"
"C:\Program Files\Monkey's Audio\MAC.exe" %s %d -c2000
- Note 1: This needs to point to where the MAC.exe is located and please ensure that " " is around the full location.
- Note 2: The green portion is where you would change the compression level.
- Fast = -c1000 ; Normal = -c2000 ; High = -c3000 ; Extra High = -c4000 ; Insane = -c5000
WavPack (see also: EAC and WavPack)
- Use file extension : .wv
- Program, including path, used for compression : Browse and locate 'wavpack.exe'.
- Additional command line options :
-h -w "Artist=%a" -w "Title=%t" -w "Album=%g" -w "Year=%y" -w "Track=%n" -w "Genre=%m" %s %d
Ripping a CD
- Insert a CD you would like to rip.
- freedb should automatically get the CD information, if it doesn't go back to the EAC Options>General and enable "On unknown CDs" and select "automatically access online freedb database". Make sure you put an email address in the freedb / Database options or else you cannot get access.
- Run Action>Test and Copy Selected Tracks>Compress... (shortcut key combination: Shift+F6)
- Select Action>Create CUE Sheet>Multiple WAV Files With Gaps... (Noncompliant)
- While the program extracts the CD open the cue Sheet that it made with a text editor such as notepad and run find/replace and replace .wav and WAVE with the files extension you used for compression (ie for FLAC replace it with ".flac" and "FLAC" or for Apple Lossless replace it with ".m4a" and "Apple Lossless"). Also delete all the directory folders using the find/replace feature by leaving the replace field empty (for the recommended file naming scheme, delete ARTIST\(YEAR) ALBUM\). Save the cue sheet and move it into the folder where the music is located (ie ARTIST\(YEAR) ALBUM\). When the CD is done extracting and compressing the CUE can now be used to write a CD using a program that is compatable with EAC's noncompliant CUE sheets such as burrrn (Nero will not work unfortunately).
- Enjoy your perfectly ripped music.
