CDex and FLAC: Difference between revisions
mNo edit summary |
m (→See also) |
||
| Line 33: | Line 33: | ||
==See also== | ==See also== | ||
* [[ | * [[CDex]] | ||
* [[cdparanoia]] | * [[cdparanoia]] | ||
[[Category:Guides]] | [[Category:Guides]] | ||
Revision as of 18:55, 1 February 2007
This guide acts as a quick and painless way to make a lossless-backup with CDex and FLAC. It does not go into detail about configuring cdparanoia or transferring metadata over to appropriate files using external parameters, etc.
Software needed
Note: CDex should have native FLAC support already
- CDex 1.70 Beta 2
- Flac 1.1.3 Encoder DLL
Installation
Note: Guides assumes your output directory for your files has already been configured if not click on Options menu then click Settings and select Filenames tab
- Install libFLAC.dll to the root CDex directory on your computer (default: cdex_170_beta2)
- See Configuring CDex and CD-ROM Drives
Configuration
- Open CDex and insert a CD into the drive
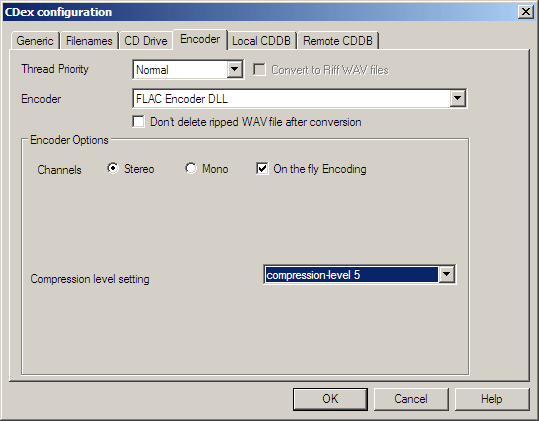
- Click the Options menu then click Settings and select Encoder tab
- Change Encoder drop down menu to FLAC Encoder DLL
- Change the box so that On the fly Encoding is checked off
- Change the appropriate compression setting level (default: -compression-level 5 |
- best: --compression-level 8 )
- Click OK
- Highlight selected tracks you want to extract and click toolbar button second from the top (Extract CD track(s) to Compressed Audio File(s))
- By default cdparanoia will open up and begin extracting tracks from your default CD-ROM drive to the appropriate folders
Screenshot

CDex and CUE Sheets
- CDex has limited support for creating CUE sheets in current beta release
